Super-Diamond配置管理服务器
write by donaldhan, 2018-04-20 00:00引言
在我们配置服务器属性时候,一般常使用方法,将配置属性放在一个配置文件中,当应用上线时,需要修改配置文件,这样容易导致手动修改配置文件出错; 自从maven的出现使我们可以,我们可以将不同环境的配置,写到不同的文件中,比如(dev,test ,exp,prod)等环境,在项目上线时,我们只需要根据 Profile属性,打包相应的属性文件,这样避免的手动修改配置引起的认为问题,但无法解决修改配置文件需要重新启动或重新打包的问题。历史的车轮,终是向前推动的。 一些配置管理服务顺应出现,比如Spring的spring-cloud-config, 淘宝的淘宝diamond,另外还有一种轻量级的配置管理服务器[ Super-Diamond][]。Spring家族的 spring-cloud-config的文档,分支版本管理比较规范,毕竟是专业滴。淘宝的diamond,不知现在淘宝现在,还在不在用,不过,在github上,搜不到淘宝的diamond,但是有个 diamond的分支,不过文档很少,这也是阿里开源产品通病。今天我们来看轻量级的配置管理服务器Super-Diamond,从源码的版权声明来看是苏州科大国创信息技术有限公司的产品。
目录
Super-Diamond架构设计
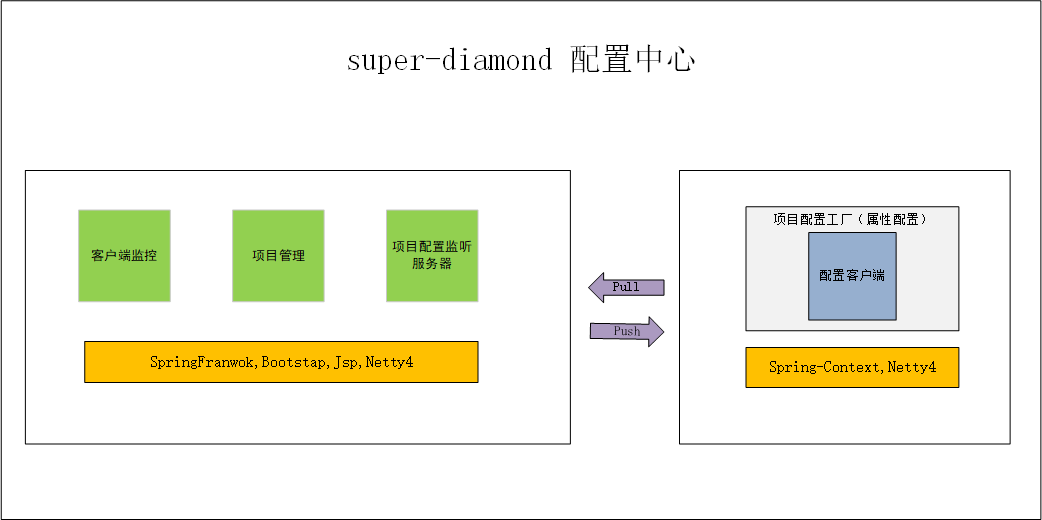
从上图中,我们可以看到Super-Diamond主要包括两部分,一个是配置中心服务端,一个配置中心客户端。在服务中心配置,有一个配置中心后台界面我们可以管理项目和项目配置项,同时有一个 配置监听服务器。当项目配置改变时,配置监听服务器将配置更改信息以Json字符串的形式,推送到客户端。客户端启动时,开启一个定时任务以一定的间隔从服务端拉取配置信息(开启重新加载配置)。
具体流程如下:
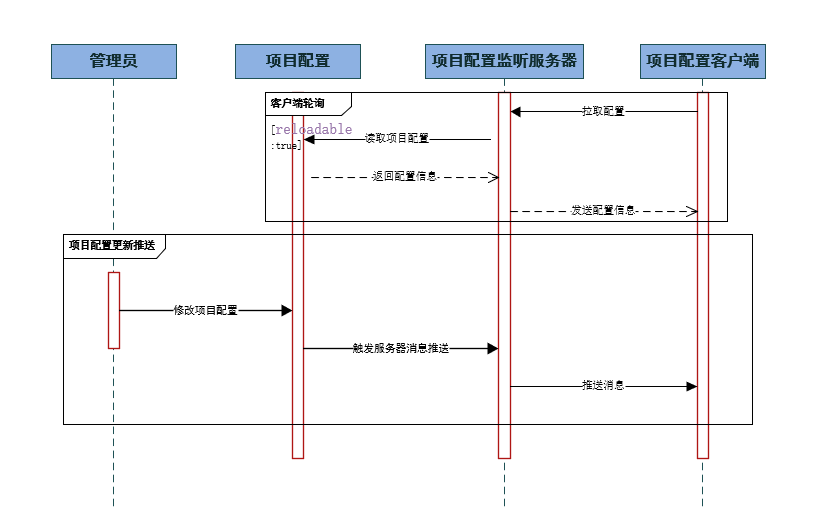
客户端启动后,先从项目配置中心拉取项目配置,并存放到本地磁盘中,当项目配置变更时,项目配置服务器将项目配置变更消息,发送给客户端。如果开启重新加载配置项,则轮询项目配置。
由于所有的配置信息,实际上是放在数据库中,下面我们来看Super-Diamond数据库设计。
Super-Diamond数据库设计
Super-Diamond其实是将配置信息放在数据库表中,客户端拉取时,服务端从数据库中,以Json字符串的形式,发送给客户端。主要表结构项目表,项目配置表,项目模块表,用户表。 这里我们就不给出数据库表设计图了,只简单给不表创建语句。具体如下:
项目表
CREATE TABLE `CONF_PROJECT` (
  `ID` int(11) NOT NULL,
  `PROJ_CODE` varchar(32) DEFAULT NULL,
  `PROJ_NAME` varchar(32) DEFAULT NULL,
  `OWNER_ID` int(11) DEFAULT NULL COMMENT '拥有者id',
  `DEVELOPMENT_VERSION` INT(11) DEFAULT 0  NULL,
  `PRODUCTION_VERSION` INT(11) DEFAULT 0  NULL,
  `TEST_VERSION` INT(11) DEFAULT 0  NULL,
  `DELETE_FLAG` int(1) DEFAULT '0',
  `CREATE_TIME` datetime DEFAULT NULL,
  `UPDATE_TIME` datetime DEFAULT NULL,
  PRIMARY KEY (`ID`)
) ENGINE=InnoDB DEFAULT CHARSET=utf8;
项目配置表
CREATE TABLE `CONF_PROJECT_CONFIG` (
  `CONFIG_ID` INT(11) NOT NULL,
  `CONFIG_KEY` VARCHAR(64) NOT NULL COMMENT '项目开发环境配置Key',
  `CONFIG_VALUE` VARCHAR(256) NOT NULL COMMENT '项目开发环境配置值',
  `CONFIG_DESC` VARCHAR(256) DEFAULT NULL,
  `PROJECT_ID` INT(11) NOT NULL,
  `MODULE_ID` INT(11) NOT NULL,
  `DELETE_FLAG` INT(1) DEFAULT '0',
  `OPT_USER` VARCHAR(32) DEFAULT NULL,
  `OPT_TIME` DATETIME DEFAULT NULL,
  `PRODUCTION_VALUE` VARCHAR(256) NOT NULL COMMENT '生产开发环境配置值',
  `PRODUCTION_USER` VARCHAR(32) DEFAULT NULL,
  `PRODUCTION_TIME` DATETIME DEFAULT NULL,
  `TEST_VALUE` VARCHAR(256) NOT NULL COMMENT '项目测试环境配置值',
  `TEST_USER` VARCHAR(32) DEFAULT NULL,
  `TEST_TIME` DATETIME DEFAULT NULL,
  `BUILD_VALUE` VARCHAR(256) NOT NULL COMMENT '项目预发(体验)环境配置值',
  `BUILD_USER` VARCHAR(32) DEFAULT NULL,
  `BUILD_TIME` DATETIME DEFAULT NULL,
  PRIMARY KEY (`CONFIG_ID`)
) ENGINE=INNODB DEFAULT CHARSET=utf8;
从上面可以看出,项目环境主要有测试,BUILD,和生产环境。
项目模块表
CREATE TABLE `CONF_PROJECT_MODULE` (
  `MODULE_ID` int(11) NOT NULL,
  `PROJ_ID` int(11) NOT NULL,
  `MODULE_NAME` varchar(32) DEFAULT NULL,
  PRIMARY KEY (`MODULE_ID`)
) ENGINE=InnoDB DEFAULT CHARSET=utf8;
配置用户表
CREATE TABLE `CONF_USER` (
  `ID` int(11) NOT NULL,
  `USER_CODE` varchar(32) DEFAULT NULL,
  `USER_NAME` varchar(32) NOT NULL,
  `PASSWORD` varchar(32) NOT NULL,
  `DELETE_FLAG` int(1) DEFAULT '0',
  `CREATE_TIME` datetime DEFAULT NULL,
  `UPDATE_TIME` datetime DEFAULT NULL,
  PRIMARY KEY (`ID`)
) ENGINE=InnoDB DEFAULT CHARSET=utf8;
项目用户关系表,项目用户角色权限表
CREATE TABLE `CONF_PROJECT_USER` (
  `PROJ_ID` int(11) NOT NULL,
  `USER_ID` int(11) NOT NULL DEFAULT '0',
  PRIMARY KEY (`PROJ_ID`,`USER_ID`)
) ENGINE=InnoDB DEFAULT CHARSET=utf8;

CREATE TABLE `CONF_PROJECT_USER_ROLE` (
  `PROJ_ID` int(11) NOT NULL,
  `USER_ID` int(11) NOT NULL,
  `ROLE_CODE` varchar(32) NOT NULL,
  PRIMARY KEY (`PROJ_ID`,`USER_ID`,`ROLE_CODE`)
) ENGINE=InnoDB DEFAULT CHARSET=utf8;
从数据库的表设计可以看出,配置管理中心,关键点主要是项目和项目配置(test,build,product)
Super-Diamond服务端
服务端两中部署方式,一种放在tomcat中,一个是放到Jetty中。我们先来看Tomcat方式: 配置监听服务器主要由Spring的应用上下文来管理,在bean工厂初始化的时候,初始化配置监听服务器。 具体的配置在applicationContext.xml配文件中:
<bean id="jdbcTemplate" class="org.springframework.jdbc.core.JdbcTemplate" >
    	<constructor-arg index="0" ref="dataSource" />
    </bean>

    <!-- 配置事务管理器 -->
	<bean id="transactionManager" class="org.springframework.jdbc.datasource.DataSourceTransactionManager">
  		<property name="dataSource" ref="dataSource" />
 	</bean>

	<bean id="transactionTemplate" class="org.springframework.transaction.support.TransactionTemplate">
 		<property name="transactionManager" ref="transactionManager" />
 	</bean>

 	<tx:annotation-driven transaction-manager="transactionManager" proxy-target-class="true" />

	<context:component-scan base-package="com.github.diamond.web"/>

	<bean id="diamondServerHandler" class="com.github.diamond.netty.DiamondServerHandler" />
	<bean class="com.github.diamond.netty.DiamondServer">
		<property name="port" value="${netty.server.port}" />
		<property name="serverHandler" ref="diamondServerHandler" />
	</bean>
从上面配置来看,主要配合中心服务端的Dao使用的是JdbcTemplate。
下面我们根据服务端的几个关键类,来看一下服务端:

从上图中,我们可以看到两个关键的类,ConfigService, ConfigController和 ,DiamondServerHandler。
先来看DiamondServerHandle:
@Sharable
public class DiamondServerHandler extends SimpleChannelInboundHandler<String> {
	public static ConcurrentHashMap<ClientKey /*projcode+profile*/, List<ClientInfo> /*client address*/> clients =
			new ConcurrentHashMap<ClientKey, List<ClientInfo>>();
	private ConcurrentHashMap<String /*client address*/, ChannelHandlerContext> channels =
			new ConcurrentHashMap<String, ChannelHandlerContext>();
    private final Charset charset = Charset.forName("UTF-8");
    @Autowired
    private ConfigService configService;
}
从上面可以看出,DiamondServerHandler保存着所有客户端的信息,并且是共享模式,以便项目配置有变动时, 将配置信息推送给所有客户端。
下面我们在来看,推送信息给客户端
/**
    * 向服务端推送配置数据。
    *
    * @param projCode
    * @param profile
    * @param config
    */
   public void pushConfig(String projCode, String profile, final String module) {
     for(ClientKey key : clients.keySet()) {
       if(key.getProjCode().equals(projCode) && key.getProfile().equals(profile)) {
       List<ClientInfo> addrs = clients.get(key);
         if(addrs != null) {
           for(ClientInfo client : addrs) {
             ChannelHandlerContext ctx = channels.get(client.getAddress());
             if(ctx != null) {
               if(key.moduleArr.length == 0) {
                 String config = configService.queryConfigs(projCode, profile, "");
                 sendMessage(ctx, config);
               } else if(ArrayUtils.contains(key.getModuleArr(), module)) {
                 String config = configService.queryConfigs(projCode, key.getModuleArr(), profile, "");
                   sendMessage(ctx, config);
               }
             }
           }
         }
       }
     }
   }
当接收到客户端拉取配置请求时,将项目配置信息发送给客户端
/**
* 处理客户端的请求
* @param request
* @throws Exception
*/
  @SuppressWarnings("unchecked")
Override
  public void channelRead0(ChannelHandlerContext ctx, String request) throws Exception {
  	String config;
      if (request != null && request.startsWith("superdiamond=")) {
      	request = request.substring("superdiamond=".length());

      	Map<String, String> params = (Map<String, String>) JSONUtils.parse(request);
      	String projCode = params.get("projCode");
      	String modules = params.get("modules");
      	String[] moduleArr = StringUtils.split(modules, ",");
      	String profile = params.get("profile");
      	ClientKey key = new ClientKey();
      	key.setProjCode(projCode);
      	key.setProfile(profile);
      	key.setModuleArr(moduleArr);
      	//String version = params.get("version");

      	List<ClientInfo> addrs = clients.get(key);
      	if(addrs == null) {
      		addrs = new ArrayList<ClientInfo>();
      	}

      	String clientAddr = ctx.channel().remoteAddress().toString();
      	ClientInfo clientInfo = new ClientInfo(clientAddr, new Date());
      	addrs.add(clientInfo);
      	clients.put(key, addrs);
      	channels.put(clientAddr, ctx);
      	//查询配置
      	if(StringUtils.isNotBlank(modules)) {
              config = configService.queryConfigs(projCode, moduleArr, profile, "");
      	} else {
      		config = configService.queryConfigs(projCode, profile, "");
      	}
      } else {
      	config = "";
      }

      sendMessage(ctx, config);
  }
  /**
  	 * 发送项目配置信息给客户端
  	 * @param ctx
  	 * @param config
  	 */
      private void sendMessage(ChannelHandlerContext ctx, String config) {
      	byte[] bytes = config.getBytes(charset);
      	ByteBuf message = Unpooled.buffer(4 + bytes.length);
          message.writeInt(bytes.length);
          message.writeBytes(bytes);
          ctx.writeAndFlush(message);
}
当客户端断开来连接时,移除客户端信息
/**
 * 客户端断开来连接时,移除客户端信息
 * @param ctx
 * @throws Exception
 */
  @Override
  public void channelInactive(ChannelHandlerContext ctx) throws Exception {
    super.channelInactive(ctx);
    String address = ctx.channel().remoteAddress().toString();
    channels.remove(address);
    for(List<ClientInfo> infos : clients.values()) {
      for(ClientInfo client : infos) {
        if(address.equals(client.getAddress())) {
          infos.remove(client);
          break;
        }
      }
    }

    logger.info(ctx.channel().remoteAddress() + " 断开连接。");
  }
在来看看一下,在服务器管理界面修改,触发的操作:
@Controller
public class ConfigController extends BaseController {
	private static final Logger LOGGER = LoggerFactory.getLogger(ConfigController.class);
	@Autowired
	private ConfigService configService;
	@Autowired
	private ProjectService projectService;
	@Autowired
	private ModuleService moduleService;
	@Autowired
	private DiamondServerHandler diamondServerHandler;

	/**
	 *
	 * @param type profile的值
	 * @param configId
	 * @param configKey
	 * @param configValue
	 * @param configDesc
	 * @param projectId
	 * @param moduleId
	 * @param selModuleId
	 * @param page
	 * @param flag
	 * @return
	 */
	@RequestMapping("/config/save")
	public String saveConfig(String type, Long configId, String configKey, String configValue,
			String configDesc, Long projectId, Long moduleId, Long selModuleId, int page,
			@RequestParam(defaultValue="")String flag) {
		User user = (User) SessionHolder.getSession().getAttribute("sessionUser");
		if(configId == null) {
			configService.insertConfig(configKey, configValue, configDesc, projectId, moduleId, user.getUserCode());
		} else {
			configService.updateConfig(type, configId, configKey, configValue, configDesc, projectId, moduleId, user.getUserCode());
		}
		String projCode = (String)projectService.queryProject(projectId).get("PROJ_CODE");
		String moduleName = moduleService.findName(moduleId);
		//推送最新项目配置给所有客户端
		diamondServerHandler.pushConfig(projCode, type, moduleName);
		if(selModuleId != null)
			return "redirect:/profile/" + type + "/" + projectId + "?moduleId=" + selModuleId + "&flag=" + flag;
		else
			return "redirect:/profile/" + type + "/" + projectId + "?page=" + page + "&flag=" + flag;
	}
	/**
	 * @param type
	 * @param projectId
	 * @param moduleName
	 * @param id
	 * @return
	 */
	@RequestMapping("/config/delete/{id}")
	public String deleteConfig(String type, Long projectId, String moduleName, @PathVariable Long id) {
		configService.deleteConfig(id, projectId);
		String projCode = (String)projectService.queryProject(projectId).get("PROJ_CODE");
		//推送最新项目配置给所有客户端
		diamondServerHandler.pushConfig(projCode, type, moduleName);
		return "redirect:/profile/" + type + "/" + projectId;
	}
}
我们再来看一下会话处理Handler
public class SessionHolder {
    private static ThreadLocal<HttpSession> sessionThreadLocal = new ThreadLocal<HttpSession>() {

        @Override
        protected HttpSession initialValue() {
            return null;
        }

    };
    public static void remove() {
        sessionThreadLocal.remove();
    }
    public static void setSession(HttpSession session) {
        sessionThreadLocal.set(session);
    }
    public static HttpSession getSession() {
        return sessionThreadLocal.get();
    }
}
会话handler用ThreadLocal来管理所有会话,我很疑问,这个为什么用TheadLocal,而不是ConcurrentHashMap。
在来看基于Jetty的部署方式。
基于Jetty的部署方式
public class JettyServer {
	private static final Logger LOGGER = LoggerFactory.getLogger(JettyServer.class);
	private static int maxThreads;
	private static int minThreads;
	private static int serverPort;
	private static String serverHost;
	static {
		try {
			org.apache.commons.configuration.Configuration config =
					new PropertiesConfiguration("META-INF/res/jetty.properties");
			LOGGER.info("加载jetty.properties");
			maxThreads = config.getInt("thread.pool.max.size", 100);
			minThreads = config.getInt("thread.pool.min.size", 10);
			serverPort = config.getInt("server.port", 8080);
			serverHost = config.getString("server.host");
		} catch(Exception e) {
			LOGGER.error(e.getMessage(), e);
		}
	}
  //...
}
再来看Super-Diamond客户端
Super-Diamond客户端
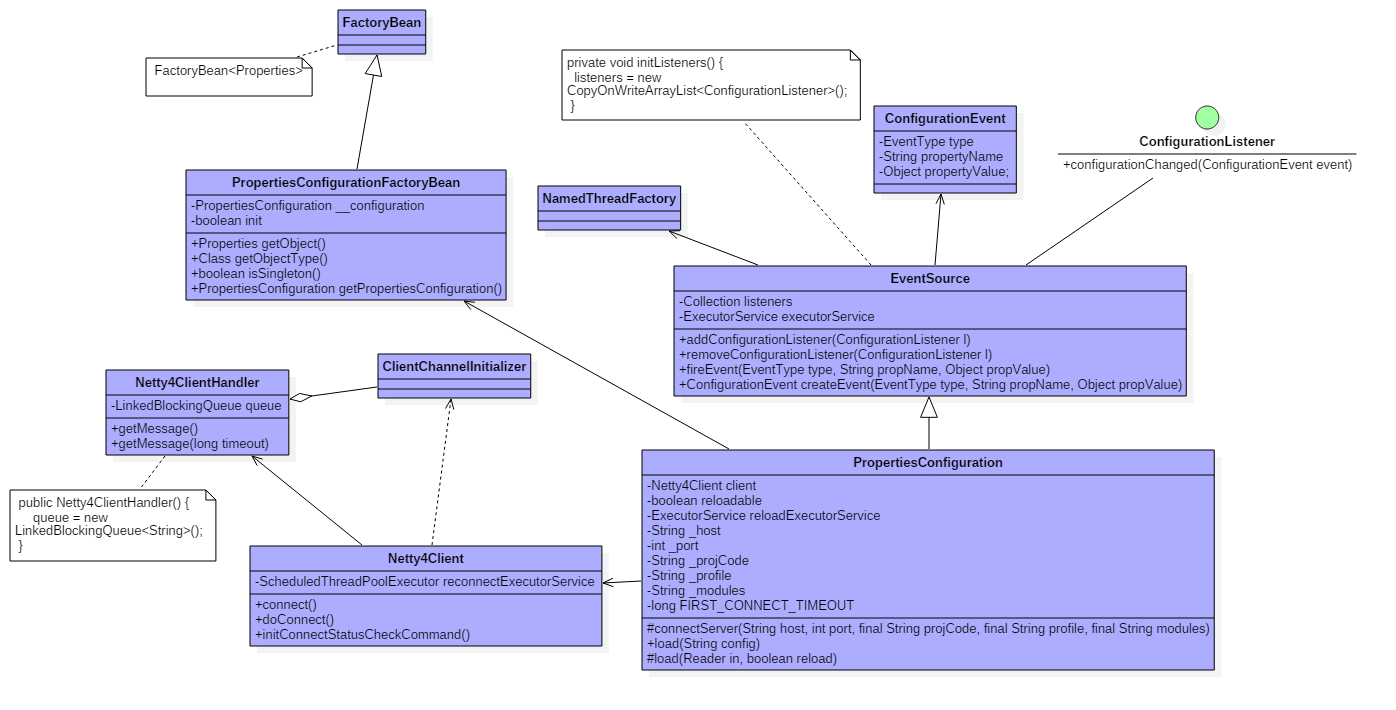
从上面可以看出,属性配置工厂PropertiesConfigurationFactoryBean为一个工厂bean,用于创建属性配置bean PropertiesConfiguration, 出行配置配置,在初始化的时候,创建Netty配置客户端,客户端从配置监听服务器主动拉取,或被动接受服务端的配置信息,及配置更信息。 客户端从服务接受到配置信息时,保存配置信息到本地文件。如果客户端连不到服务器,则从本地文件读取,如果相关文件不存在,则抛出异常。 客户端从服务接受配置信息时,如果配置消息事件类型为ADD或Update,通知注册到事件源的监听器。客户端与服务器的连接是长连接,启动时从服务器拉取配置信息,当服务器配置有变动时,推送信息给客户端。当连接失败时,调度连接服务器线程。在配置更新或新增的情况下,属性配置器创建一个配置更新触发线程通知注册到事件源的配置监听器,委托给内部的线程池取执行。
下面我们从代码层,来看一下: 我们从属性配置创建开始,
public class PropertiesConfiguration extends EventSource {
	private static final Logger LOGGER = LoggerFactory.getLogger(PropertiesConfiguration.class);
	private StrSubstitutor substitutor;
	private Map<String, String> store = null;
	private Netty4Client client;
	private volatile boolean reloadable = true;
	private static final ExecutorService reloadExecutorService = Executors.newSingleThreadExecutor(new NamedThreadFactory("ReloadConfigExecutorService", true));
	private static String _host;
	private static int _port = 0;
	private static String _projCode;
	private static String _profile;
	private static String _modules;
	private static final long FIRST_CONNECT_TIMEOUT = 2;
}
PropertiesConfiguration实际上是一个事件源,当事件发生时,通知注册到属性配置器的配置监听器。内部的线程池拥有执行,配置的重新加载。
再来连接服务器:
/**
	 * 连接服务器,如果连接成功,则接受从服务拉取的配置,保存到本地文件。
	 * @param host
	 * @param port
	 * @param projCode
	 * @param profile
	 * @param modules
	 */
	protected void connectServer(String host, int port, final String projCode, final String profile, final String modules) {
		Assert.notNull(projCode, "连接superdiamond, projCode不能为空");

		final String clientMsg = "superdiamond={\"projCode\": \"" + projCode + "\", \"profile\": \"" + profile + "\", "
				+ "\"modules\": \"" + modules + "\", \"version\": \"1.1.0\"}";
		try {
			client = new Netty4Client(host, port, new ClientChannelInitializer(clientMsg));

			if(client.isConnected()) {
				String message = client.receiveMessage(FIRST_CONNECT_TIMEOUT);

				if(StringUtils.isNotBlank(message)) {
					String versionStr = message.substring(0, message.indexOf("\r\n"));
					LOGGER.info("加载配置信息,项目编码:{},Profile:{}, Version:{}", projCode, profile, versionStr.split(" = ")[1]);
					//保存文件
					FileUtils.saveData(projCode, profile, message);
					//加载配置
					load(new StringReader(message), false);
				} else {
					throw new ConfigurationRuntimeException("从服务器端获取配置信息为空,Client 请求信息为:" + clientMsg);
				}
			} else {//没有连接成功,则从本地磁盘配置文件中读取配置
				String message = FileUtils.readConfigFromLocal(projCode, profile);
				if(message != null) {
					String versionStr = message.substring(0, message.indexOf("\r\n"));
					LOGGER.info("加载本地备份配置信息,项目编码:{},Profile:{}, Version:{}", projCode, profile, versionStr.split(" = ")[1]);

					load(new StringReader(message), false);
				} else
					throw new ConfigurationRuntimeException("本地没有备份配置数据,PropertiesConfiguration 初始化失败。");
			}
			//如果需要重新加载配置文件,则读取客户端从服务器拉取配置
			reloadExecutorService.submit(new Runnable() {

				@Override
				public void run() {
					while(reloadable) {
						try {
							if(client.isConnected()) {
								String message = client.receiveMessage();

								if(message != null) {
									String versionStr = message.substring(0, message.indexOf("\r\n"));
									LOGGER.info("重新加载配置信息,项目编码:{},Profile:{}, Version:{}", projCode, profile, versionStr.split(" = ")[1]);
									FileUtils.saveData(projCode, profile, message);
									load(new StringReader(message), true);
								}
							} else {
								TimeUnit.SECONDS.sleep(1);
							}
						} catch(Exception e) {

						}
					}
				}
			});
		} catch (Exception e) {
			if(client != null) {
				client.close();
			}
			throw new ConfigurationRuntimeException(e.getMessage(), e);
		}
	}
需要注意的一点是,当重新加载配置开启时,客户端将会轮询项目配置信息。 再来看加载配置
/**
	 * 加载配置文件
	 *
	 * @param in
	 * @param reload 初次初始化加载为false,服务端推送加载为true。
	 * @throws Exception
	 */
	public void load(Reader in, boolean reload) throws ConfigurationRuntimeException {
		Map<String, String> tmpStore = new LinkedHashMap<String, String>();

		PropertiesReader reader = new PropertiesReader(in);
		try {
			while (reader.nextProperty()) {
				String key = reader.getPropertyName();
				String value = reader.getPropertyValue();
				tmpStore.put(key, value);
				//通知配置监听器
				if(reload) {
					String oldValue = store.remove(key);
					if(oldValue == null)
						fireEvent(EventType.ADD, key, value);
					else if(!oldValue.equals(value))
						fireEvent(EventType.UPDATE, key, value);
				}
			}

			if(reload) {
				for(String key : store.keySet()) {
					fireEvent(EventType.CLEAR, key, store.get(key));
				}
			}
		} catch (IOException ioex) {
			throw new ConfigurationRuntimeException(ioex);
		} finally {
			try {
				reader.close();
			} catch (IOException e) {
				;
			}
		}

		if(store != null)
			store.clear();

		store = tmpStore;
	}
从上面可以看出,事件一共有3中,ADD,UPDATE,CLEAR。
事件类型:
public enum EventType {
	ADD, UPDATE, CLEAR;
}
在来看通知配置监听器
public class EventSource {
	private Collection<ConfigurationListener> listeners;
	private ExecutorService executorService =
			Executors.newSingleThreadExecutor(new NamedThreadFactory("config-event"));
	public EventSource() {
		initListeners();
	}
  /**
	 *
	 */
	private void initListeners() {
		listeners = new CopyOnWriteArrayList<ConfigurationListener>();
	}
  /**
	 * 异步执行ConfigurationListener。
	 *
	 * @param type
	 * @param propName
	 * @param propValue
	 */
	protected void fireEvent(EventType type, String propName, Object propValue) {
		final Iterator<ConfigurationListener> it = listeners.iterator();
		if (it.hasNext()) {
			final ConfigurationEvent event = createEvent(type, propName, propValue);
			while (it.hasNext()) {
				final ConfigurationListener listener = it.next();
				executorService.submit(new Runnable() {

					@Override
					public void run() {
						listener.configurationChanged(event);
					}
				});
			}
		}
	}
}
从上面可以看出,在配置更新或新增的情况下,属性配置器创建一个配置更新触发线程通知注册到事件源的配置监听器,委托给内部的线程池取执行。
我们回到连接服务器,启动配置轮询客户端拉取项目配置:
public class Netty4Client {
	private static final Logger logger = LoggerFactory.getLogger(Netty4Client.class);
	private String host;
	private int port;
	private int timeout = 1000;
    private int connectTimeout = 3000;
    private final EventLoopGroup group = new NioEventLoopGroup();
    private ClientChannelInitializer channelInitializer;
    private Bootstrap bootstrap;
    private volatile Channel channel;
    private volatile ChannelFuture future;
    private volatile  ScheduledFuture<?> reconnectExecutorFuture = null;
    private long lastConnectedTime = System.currentTimeMillis();
    private final AtomicInteger reconnect_count = new AtomicInteger(0);
    private final AtomicBoolean reconnect_error_log_flag = new AtomicBoolean(false) ;
    //重连warning的间隔.(waring多少次之后,warning一次)
    private final int reconnect_warning_period = 1800;
    private final long shutdown_timeout = 1000 * 60 * 15;
    private static final ScheduledThreadPoolExecutor reconnectExecutorService = new ScheduledThreadPoolExecutor(2, new NamedThreadFactory("ClientReconnectTimer", true));
}
配置客户端,内部有一个调度线程池,当连接失败时,调度连接服务器线程。
再来看连接配置服务器。
public Netty4Client(String host, int port, ClientChannelInitializer channelInitializer) throws Exception {
     this.host = host;
   this.port = port;
   this.channelInitializer = channelInitializer;

   try {
           doOpen();
       } catch (Throwable t) {
           close();
           throw new Exception("Failed to start " + getClass().getSimpleName() + " " + NetUtils.getLocalAddress()
                                       + " connect to the server " + host + ", cause: " + t.getMessage(), t);
       }
       try {
       //连接服务器
           connect();

           logger.info("Start " + getClass().getSimpleName() + " " + NetUtils.getLocalAddress() + " connect to the server " + host);
       } catch (Throwable t){
           throw new Exception("Failed to start " + getClass().getSimpleName() + " " + NetUtils.getLocalAddress()
                   + " connect to the server " + host + ", cause: " + t.getMessage(), t);
       }
   }
/**
    * 连接服务器
    * @throws Exception
    */
   private void connect() throws Exception {
       try {
           if (isConnected()) {
               return;
           }
           initConnectStatusCheckCommand();
           doConnect();//完成实际连接
           if (! isConnected()) {
               throw new Exception("Failed connect to server " + getRemoteAddress() + " from " + getClass().getSimpleName() + " "
                                           + NetUtils.getLocalHost() + ", cause: Connect wait timeout: " + getTimeout() + "ms.");
           } else {
             logger.info("Successed connect to server " + getRemoteAddress() + " from " + getClass().getSimpleName() + " "
                                           + NetUtils.getLocalHost() + ", channel is " + this.channel);
           }

           reconnect_count.set(0);
           reconnect_error_log_flag.set(false);
       } catch (Throwable e) {
           logger.error("Failed connect to server " + getRemoteAddress() + " from " + getClass().getSimpleName() + " "
                                       + NetUtils.getLocalHost());
       }
   }
/**
     *创建项目配置连接线程,当连接失败时调度项目连接服务器线程
     */
    private synchronized void initConnectStatusCheckCommand(){
        if(reconnectExecutorFuture == null || reconnectExecutorFuture.isCancelled()){
            //创建项目配置连接线程,
            Runnable connectStatusCheckCommand =  new Runnable() {
                public void run() {
                    try {
                        if (! isConnected()) {
                            connect();
                        } else {
                            lastConnectedTime = System.currentTimeMillis();
                        }
                    } catch (Throwable t) {
                        String errorMsg = "client reconnect to "+getRemoteAddress()+" find error . ";
                        if (System.currentTimeMillis() - lastConnectedTime > shutdown_timeout){
                            if (!reconnect_error_log_flag.get()){
                                reconnect_error_log_flag.set(true);
                                logger.error(errorMsg, t);
                                return ;
                            }
                        }
                        if ( reconnect_count.getAndIncrement() % reconnect_warning_period == 0){
                            logger.warn(errorMsg, t);
                        }
                    }
                }
            };
            //当连接失败时调度项目连接服务器线程
            reconnectExecutorFuture = reconnectExecutorService.scheduleWithFixedDelay(connectStatusCheckCommand, 2 * 1000, 2 * 1000, TimeUnit.MILLISECONDS);
        }
    }
/**
     * 完成实际连接
     * @throws Throwable
     */
    private void doConnect() throws Throwable {
        long start = System.currentTimeMillis();
        future = bootstrap.connect(getConnectAddress());
        try{
            boolean ret = future.awaitUninterruptibly(getConnectTimeout(), TimeUnit.MILLISECONDS);

            if (ret && future.isSuccess()) {
                Channel newChannel = future.sync().channel();

                try {
                    // 关闭旧的连接
                    Channel oldChannel = Netty4Client.this.channel;
                    if (oldChannel != null) {
                        logger.info("Close old netty channel " + oldChannel + " on create new netty channel " + newChannel);
                        oldChannel.close();
                    }
                } finally {
                	Netty4Client.this.channel = newChannel;
                }
            } else if (future.cause() != null) {
                throw new Exception("client failed to connect to server "
                        + getRemoteAddress() + ", error message is:" + future.cause().getMessage(), future.cause());
            } else {
                throw new Exception("client failed to connect to server "
                        + getRemoteAddress() + " client-side timeout "
                        + getConnectTimeout() + "ms (elapsed: " + (System.currentTimeMillis() - start) + "ms) from netty client "
                        + NetUtils.getLocalHost());
            }
        }finally{
            if (! isConnected()) {
                future.cancel(true);
            }
        }
    }
从上面可以看出,客户端与服务器的连接是长连接,启动时从服务器拉取配置信息,当服务器配置有变动时,推送信息给客户端。当连接失败时,调度连接服务器线程。注意调度的时候,使用的是scheduleWithFixedDelay方法,而不是AtscheduleFixedDelay。
再来看接收项目配置消息:
/**
	 * 使用时,循环调用该方法获取服务端返回的信息。
	 * receiveMessage是阻塞方法,如果没有消息会等待。
	 **/
	public String receiveMessage() {
		return channelInitializer.getClientHandler().getMessage();
	}

	public String receiveMessage(long timeout) {
		return channelInitializer.getClientHandler().getMessage(timeout);
	}
接收消息,实际委托给通道处理器。
@Sharable
public class Netty4ClientHandler extends SimpleChannelInboundHandler<String> {
    private final LinkedBlockingQueue<String> queue;
    @Override
    protected void channelRead0(ChannelHandlerContext ctx, String message) throws Exception {
    	queue.add(message);
    }
    public String getMessage() {
		String message = null;
		try {
			message = queue.take();
		} catch (InterruptedException e) {
		}
		return message;
	}

    /**
     *
     * @param timeout 超时时间,单位秒
     * @return
     */
    public String getMessage(long timeout) {
		String message = null;
		try {
			message = queue.poll(timeout, TimeUnit.SECONDS);
		} catch (InterruptedException e) {
		}
		return message;
	}
}
注意客户端,使用的也是共享模式通道处理器,保证配置的全局性。
来小节一下:
属性配置工厂PropertiesConfigurationFactoryBean为一个工厂bean,用于创建属性配置bean PropertiesConfiguration, 出行配置配置,在初始化的时候,创建Netty配置客户端,客户端从配置监听服务器主动拉取,或被动接受服务端的配置信息,及配置更信息。 客户端从服务接受到配置信息时,保存配置信息到本地文件。如果客户端连不到服务器,则从本地文件读取,如果相关文件不存在,则抛出异常。 客户端从服务接受配置信息时,如果配置消息事件类型为ADD或Update,通知注册到事件源的监听器。客户端与服务器的连接是长连接,启动时从服务器拉取配置信息,当服务器配置有变动时,推送信息给客户端。当连接失败时,调度连接服务器线程。在配置更新或新增的情况下,属性配置器创建一个配置更新触发线程通知注册到事件源的配置监听器,委托给内部的线程池取执行。
下面我们再来看项目存在的问题。
存在的问题,不规范地方
- 日志
public class ConfigController extends BaseController {
	private static final Logger LOGGER = LoggerFactory.getLogger(ConfigController.class);
}
abstract public class BaseController {
	protected static final Logger logger = LoggerFactory.getLogger(BaseController.class);
}
从上面可以看出,日志命名不统一。
- 摒弃System,StringBuilder -》 StringBuffer
/** * 打印工程版本信息 * * @author libinsong1204@gmail.com * @date 2012-3-1 下午1:20:50 */ @SuppressWarnings("serial") public class PrintProjectVersionServlet extends GenericServlet { private static final Logger logger = LoggerFactory.getLogger(PrintProjectVersionServlet.class); @Override public void init(ServletConfig config) throws ServletException { StringBuilder sBuilder = new StringBuilder("\n"); try { Enumeration<java.net.URL> urls; ClassLoader classLoader = findClassLoader(); if (classLoader != null) { urls = classLoader.getResources("META-INF/res/env.properties"); } else { urls = ClassLoader.getSystemResources("META-INF/res/env.properties"); } if (urls != null) { while (urls.hasMoreElements()) { java.net.URL url = urls.nextElement(); try { BufferedReader reader = new BufferedReader(new InputStreamReader(url.openStream(), "utf-8")); Properties properties = new Properties(); properties.load(reader); sBuilder.append("项目名称:").append(properties.getProperty("project.name")).append(", "); sBuilder.append("项目版本:").append(properties.getProperty("build.version")).append(", "); sBuilder.append("构建时间:").append(properties.getProperty("build.time")).append(".\n"); } catch (Throwable t) { logger.error(t.getMessage(), t); } } } } catch (Throwable t) { logger.error(t.getMessage(), t); } String info = sBuilder.toString(); System.out.println("==================================="); System.out.println(info); System.out.println("========================================"); } @Override public void service(ServletRequest req, ServletResponse res) throws ServletException, IOException { } private static ClassLoader findClassLoader() { return PrintProjectVersionServlet.class.getClassLoader(); } } - 密码泄漏
@Controller
public class SecurityController extends BaseController {
 @Autowired
 private UserService userService;

 @RequestMapping(value="/login",method = RequestMethod.POST)
 public String login(HttpServletRequest request, String userCode, String password) {
 	Object result = userService.login(userCode, password);
     if (result instanceof User) {
     	request.getSession().removeAttribute("message");
         request.getSession().setAttribute("sessionUser", result);
         return "redirect:/index";
     } else {
     	request.getSession().setAttribute("userCode", userCode);
     	request.getSession().setAttribute("message", result);
         return "redirect:/";
     }
 }
}
@Service
public class UserService {
	@Autowired
	private JdbcTemplate jdbcTemplate;
	public Object login(String userCode, String password) {
		String md5Passwd = MD5.getInstance().getMD5String(password);

		try {
			String sql = "SELECT ID, USER_NAME, PASSWORD, DELETE_FLAG " +
					"FROM CONF_USER WHERE USER_CODE = ?";
			User user = jdbcTemplate.query(sql, new UserResultSetExtractor(), userCode);

			if(md5Passwd.equals(user.getPassword())) {
				user.setUserCode(userCode);
				return user;
			} else if(user.getDeleteFlag() == 1)
				return "用户已经被注销";
			else
				return "登录失败,用户密码不正确";
		} catch(TransientDataAccessResourceException e) {
			return "登录失败,用户不存在";
		}
	}
}
从上面可以看出,用户登录密码,转到后台是没有加密的密码,这样,容易导致密码泄漏。同时还有一个问题,很到消息字符串是硬编码,不便于修改。
- 异常信息没有输出
public void load(Reader in, boolean reload) throws ConfigurationRuntimeException {
     Map<String, String> tmpStore = new LinkedHashMap<String, String>();

     PropertiesReader reader = new PropertiesReader(in);
     try {
         while (reader.nextProperty()) {
             String key = reader.getPropertyName();
             String value = reader.getPropertyValue();
             tmpStore.put(key, value);
             if(reload) {
                 String oldValue = store.remove(key);
                 if(oldValue == null)
                     fireEvent(EventType.ADD, key, value);
                 else if(!oldValue.equals(value))
                     fireEvent(EventType.UPDATE, key, value);
             }
         }

         if(reload) {
             for(String key : store.keySet()) {
                 fireEvent(EventType.CLEAR, key, store.get(key));
             }
         }
     } catch (IOException ioex) {
         throw new ConfigurationRuntimeException(ioex);
     } finally {
         try {
             reader.close();
         } catch (IOException e) {
             ;
         }
     }

     if(store != null)
         store.clear();
     store = tmpStore;
 }
从上面可以看出,异常信息没有输出。
综上,super-diamond虽然有他的易操作性,但代码规范上,以及安全性上面还是存在一定的问题,有待改进。
再来看一下super-diamond与spring-cloud-config版本控制数据。
-
super-diamond 105 commits 1 branch 0 releases 5 contributors
-
spring-cloud-config 885 commits 17 branches 48 releases 69 contributors Apache-2.0
从上述数据可以看出,spring-cloud-config的分支管理更规范,活跃度更高。
总结
super-diamond使用数据库来存放项目配置信息,当配置有变动时,推送到所有客户端,当连接失败时,调度连接服务器线程。super-diamond配置中心可能有一个问题,如果出现配置服务器挂掉,我们必须将无法修改项目配置。 其实我们也可使用Zookeeper来存储项目配置,建立一个Zookeeper集群,可以解决这个问题,另外使用ZK ,我们只需要监听相关的配置节点即可。另外还有一个问题,当我们开启super-diamond的重新加载配置时,客户端将会轮询项目配置, 这样无论项目配置有没有更改,都要轮询,在CPU资源紧缺的情况下,轮询将占用一定的资源,对于问题,同样可以使用ZK的Watcher模式,当项目配置有变动时,Zk服务器直接通知项目配置监听者。 另一种是使用spring-cloud-config(重量级),不过这个还没有研究过。